Monday 29 February 2016

The Tale of the Party Hat That Became a Kite

Hello everyone and welcome to my first post of the week which is a bit late as I had a bit of a struggle with our challenge this time at Make My Monday where Marina would like to see something with a KITE on.
I don't have anything kite related at all so spent some time pondering on it and then late yesterday after have made a birthday card for my eldest nephew, I was putting the stamps away and inspiration struck!
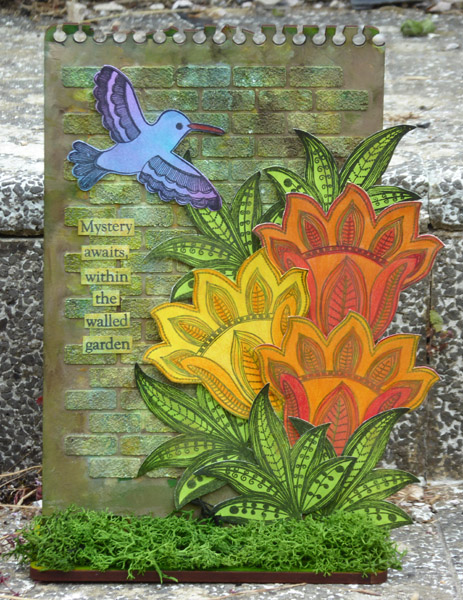
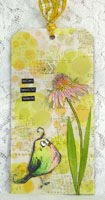
Here's my card which took a bit of time actually coming together and is the tale of how a party hat became a kite - and yes, you did read that right! If you look below, you might see what I mean.


This is a one layer card as in it doesn't have anything stuck on, I just did a lot of layering until I was happy with the effect.
I first stamped on the bird, following that with the party hat from the Crazy Things stamp set which I stamped upside down near the top corner of my 5x7 card as the crazy bird is looking up.
I stamped the text from a Dylusions set in 2 parts for balance.

I then got out a fine black pigment pen (one of my zentangle ones) and started doodling. As you can see, I added a top section on the party hat to make it more kite shaped and then repeated the pattern on the hat, drawing crossed lines to form the string. I drew a wiggly line coming down from the kite and added bows as well. I then doodled some grass and flowers to ground the bird.

I then coloured the bird, kite and text with coloured pencils, adding shadows round the text boxes to make them pop more. I added Distress inks to the bakground (Spun Sugar, Squeezed Lemonade) and deciding this was a bit flat, sprinkled on Lemon And Lime Green Brusho Crystals to add some texture. This still wasn't quite there so I stamped on my favourite Carabelle Studio Journal du Jour background stamp with Worn Lipstick Distress ink using first and second generation stamping.

Have a great week and see you soon.
Fliss xx

Friday 26 February 2016

Don't Forget To Fly For That's Crafty!

Hello everyone, sorry I've been awol the last week which is because I managed to scratch my right eye last Friday night whilst trying to extract a contact lens which seemed to have gotten glued to my eye! I'm currently wearing glasses that don't quite work so my computer time in the evening is limited as I have to work on one all day.
My post today is to let you know I have my usual Friday tutorial over at That's Crafty and this week I'm sharing a little rainbow coloured art panel which I hope you like.


You'll find all the details over at the blog as usual if you'd like to see how it was created.

Hopefully I'll be able to put my contact lenses back in over the weekend and once I can do that, I'll be round to visit.

In the meantime, have a great day and a lovely weekend.
Fliss x

Friday 19 February 2016

Circle It! At That's Crafty Challenge Blog

Hello again, I'm back with the details of our new challenge at That's Crafty Challenge Blog which for the next fortnight has the theme of Circle It!

I've made a journal style art panel for my inspiration and as you'll see it's got circles everywhere!


Do you think I've gone over the top!

It came about because when I was colouring the background, which I did by applying red, yellow and blue acrylic paints to my Gelli plate, smooshing it over with my fingers and pressing the white/grey board panel on to pick up the colour.

The colour came out a bit muddy so I gave the panel a sort of bokeh look by applying the same paints over the top with a home made circle stencil. I then used a That's Crafty Dinky Stencil to make a random dot pattern with black paint. This actually came out stronger than I wanted so I toned it down with some grey paint.

I dipped some die cut circles into some red, yellow and blue paint on my craft mat and glued some of these on when the paint was dry.

I stamped my new Carabelle butterfly on white card with black ink, cut this out and added it to the panel with foam tape. I finished off with some Tim Holtz Small Talk stickers.

I used:
Paper Artsy Fresco Finish Acrylic Paints - Haystack, London Bus
DecoArt Media Fluid Acrylics - Carbon Black, Cobalt Blue Hue, Medium Grey Value 6
That's Crafty Surfaces - White/Grey Board Panel
Carabelle Studio Mini Stamp - Butterfly
Archival Jet Black Ink
That's Crafty Dinky Stencil - Punchinella Background
Gelli Plate - 8x10
Circle Dies
Tim Holtz Small Talk Stickers

Hope you can enter - good luck!

Have a great weekend,
Fliss xx 

Life's Great Adventure

Hello and welcome to my first post of the day which is to let you know that I'm over at That's Crafty today and this week I'm sharing a journal page featuring my new NK Studio stamps by Stampendous.

It's a quick page in my new kraft paper journal which is quite large and I got it because I wanted to be able to make pages fairly quickly which can be done when you don't cover all of the background - I definitely wanted to leave some of the kraft paper on show as I love it too much to cover it all up!


This is just a sneak peek so if you'd like to see the whole page, you'll have to hop over to the blog.

I'll be back later with details of our new challenge over at That's Crafty Challenge Blog which goes live at 8am today.

Fliss xx

Monday 15 February 2016

The Love Word at Make My Monday

Hello everyone, I hope you all had a good weekend. Mine was somewhat busy yet again so apologies for the lack of visiting which is all I seem to be doing lately!
We have a new challenge for you today at Make My Monday and we'd like to see your creations with the word Love on. Easy, huh!
My inspiration is the Valentine card I gave to my hubby which is very simple as he doesn't like fussy and unusually for me took only 10 minutes to make! Hope you like it.


As you can see there's only one layer. I started by stamping the 2 bunnies (Crafty Individuals) on my card blank with Archival Watering Can ink and coloured them with pencils. As the bunnies are a bit scribbly I scribbled the colour on and I think I quite like the effect!
I then stamped the love and heart text above with VersaFine Satin Red ink, the stamp being the lovely free cover stamp from Jennie of The Artist Stamper given by Craft Stamper magazine. I added a little colour with pencils to finish.
Ta da! Done!

Some challenges I'd like to enter:

CAS on Sunday - Valentine
Come and Get It Challenges - Love Is In The Air
A Gem of a Challenge - Love Is In The Air

Friday 12 February 2016

Love Me Do Art Panel At That's Crafty

Hello there, I'm still here in case you were wondering, I've just been extremely busy with no time for much in the way of blogging this week!
I have a post today over at That's Crafty and I've gone rather romantic due to it being a certain day at the weekend.
This week I've made an art panel on a hearts theme which I hope you like. Here's a sneak peek and you'll find the whole thing over at the blog.


I'd love it if you hopped over so thank you so much if you do!

Have a great day and a lovely weekend.

Fliss xx

Friday 5 February 2016

First Love At That's Crafty Challenge Blog

Hello again and welcome to my inspiration for the new challenge over at That's Crafty Challenge Blog which for the next fortnight has the theme of First Love.
I have to admit to have been a bit stumped by this theme until I woke up the other morning thinking about the pop posters I had on my bedroom wall when I was a teenager - I bet you all had those too though maybe not of David Cassidy as I did!
This is what inspired my card although it has turned out a bit more pink than I anticipated - can you see her looking at her pop idol?


I made the background paper first using my 6x6 Gelli Plate. I added dots of pink and green acrylic paints (Paper Artsy Fresco Finish) to the plate and spread the colour with a brayer. I then tried my hand at mark making which I did with a wooden skewer which I pressed gently in the paint to make a rough pattern.
I then used the That's Crafty Long Hearts Background Dinky Stencil with the deep pink paint to add a pattern in the bottom right hand corner.


I stamped some tiny flowers from the Tim Holtz Crazy Things stamp set on the top portion with Ranger Wild Orchid Dye Ink.
I stamped my 2 birds, the hearts, flowery hat and bouquet from the Crazy Things set onto stamping card and painted them with Martha Stewart and DecoArt Media Fluid Acrylics. I then die cut everything with the matching dies.
I die cut the heart frame from green textured card using the X Cut Nesting Dies Homespun Heart set.

I assembled the card as you see, adding the quirky bird to the frame and trimming off the excess. I finished off with a Small Talk sticker which I cut into pieces.

I hope you can enter for the chance at a fab prize of a voucher for the online shop.

Have a great day and a lovely weekend.
Fliss xx

Butterfly, Butterfly Brusho Stackable Storage Box

Hello everyone and welcome to the first of 2 posts today and I can't tell you how excited I am to finally be able to share a project that has been under wraps for a while.
Laura and Graham at That's Crafty have developed a range of stackable storage boxes designed to hold some of your favourite art supplies such as paint, spray inks, glitter glue and so on.
As I'm such a fan of Brusho Crystals, you can probably guess who was given that particular storage box to decorate!
If you hop on over to the blog you'll find all the details of how I made the box with step by step decorating pics.
It's rather eye poppingly bright as I wanted something eye catching.


This one has winged it's way (pun intended!) to Laura as That's Crafty will be doing something special later in the month but I do have another one to decorate for myself and I'll share that as soon as I'm able to find some spare time to get it done - I can't wait!

Do hop on over to the blog where you'll find the details of the other fab storage boxes, all beautifully decorated by my DT mates!

I'll be back in a while as we have a new challenge starting today over at That's Crafty Challenge Blog and I have some rather quirky inspiration to share.

Fliss xx

Monday 1 February 2016

A Colour Challenge At Make My Monday

A slightly late post from me for my inspiration for the new challenge today at Make My Monday as I was a bit naughty having been desparate to get my tag done for Tim's 2016 Remix Tags and I couldn't manage to fit both in due to family stuff over the weekend.
The challenge is a colour one Pink, Red and White which although perfect for Valentine cards is not what I actually did!


This was very simple to make and I began by applying dots of Sherbert and Vintage Lace Paper Artsy Fresco Finish acrylics to my 6x6 Gelli Plate and scraped the paint over with an old store card. I then pressed on a panel of smooth cartridge paper and picked up the colour.
I next stamped the taxt from Tim Holtz Handwritten Thoughts stamp set with VersaFine Crimson Red ink and heat embossed it with Chinese Red which has a sparkle you can't see that well here.
I then used a That's Crafty hearts Dinky Stencil with a slightly deeper pink paint to make a pattern on the painted panel.
I stamped the Tim Holtz Runway lady with Archival Watering Can ink on cartridge paper and painted her with a mix of Paper Artsy and Martha Stewart paints.
I distressed the edges of the painted panel and added it to a white card blank then finished off with the lady, cut out and added with foam pads for dimension.

Have a great week.
Fliss xx